Introduction
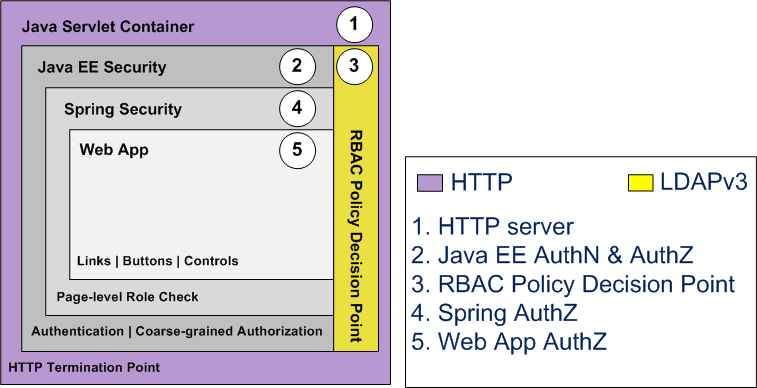
The aim of this tutorial is to demonstrate how a simple wicket web app can be converted to use java EE and fortress security. It’s not intended to highlight all of the possible locations in code where security checks may be applied. For that take a look at The Apache Fortress End-to-End Security Tutorial.
Course Prerequisites
Before starting, you need a working fortress environment up and running. Complete one of the following:
Steps to Enable Security in Wicket Sample
a. extract the zip
b. follow the instructions in README.md
You may now hit the sample web app:
http://localhost:8080/wicket-sample

no security
This is the view you will see when clicking on link for Page1. Despite what it says about rbac perms, it’s an example of an app that’s not secured. Users are not required to logon and may navigate freely.
To enable security for this app, continue on…
The following instructions are duplicated by: README-ENABLE-FORTRESS.md
2. Add the Java EE security required artifacts
If you are using the wicket-sample source, this is already done. It includes wicket components LoginPage.java, LogoutPage.java (plus associated markup files LoginPage.html, LogoutPage.html), and the static html files under the /login folder. These files control the flow between the container and wicket with java EE security enabled.

java EE login page
more on java EE security
Declarative style of security, one with no api calls made by programmer (during logon). This makes java EE security both error resistant and hardened to attack, though it tends to get in the way of the page flows. We’ll cover this topic, in more detail, on a future post.
Prepare maven for fortress.
a. Uncomment the fortress web dependency at the top of the file.
 <!-- TODO STEP 3: uncomment for fortress security dependency: -->
 <dependency>
   <groupId>org.apache.directory</groupId>
   <artifactId>fortress-web</artifactId>
   <version>${project.version}</version>
   <classifier>classes</classifier>
 </dependency>
b. Uncomment the maven ant task near the bottom of the file.
This plugin calls the fortress load procedure during normal maven tasks like install or deploy. The fortress load inserts the app’s security policy into ldap. It can be overridden by passing param -Dnoload which tells the plugin not to execute.
 <plugin>
   <artifactId>maven-antrun-plugin</artifactId>
   <version>1.7</version>
   <executions>
   <execution>
     <phase>test</phase>
     <configuration>
     <target name="fortress-load"
       if="load.file"
       description="Loads wicket sample security policy into ldap">
...
At the completion of this step, the necessary binaries will be available to the app and the app’s security policy file will be ready to load.
Prepare the app for fortress.
a. Uncomment the spring settings.
 <!-- TODO STEP 4a: uncomment to enable fortress spring bean injection: -->
 <context-param>
   <param-name>contextConfigLocation</param-name>
   <param-value>classpath:applicationContext.xml</param-value>
 </context-param>

 <listener>
   <listener-class>org.springframework.web.context.ContextLoaderListener</listener-class>
 </listener>
Notice that we’re including a link to a spring context file: applicationContext.xml:
<?xml version="1.0" encoding="UTF-8"?>
...
  <bean id="accessMgr"
    class="org.apache.directory.fortress.core.AccessMgrFactory"
    scope="prototype"
    factory-method="createInstance">
    <constructor-arg value="HOME"/>
  </bean>

  <bean id="j2eePolicyMgr"
     class="org.apache.directory.fortress.realm.J2eePolicyMgrFactory"
     scope="prototype"
     factory-method="createInstance">
  </bean>
...
The context file holds the metadata necessary to wire the fortress objects in with their constructors and subsequently get injected into the web app as spring beans.
b. Uncomment the java ee security constraints from web.xml:
 <!-- TODO STEP 4b: uncomment to enable Java EE Security: -->
 <security-constraint>
    ...
Now container security has been enabled for this web app. It authenticates, checks roles and maintains the session.
The wicket logout page is excluded from java EE security constraints. Otherwise, a problem occurs preventing unauthorized users from logging out.
 <security-constraint>
   <web-resource-collection>
   <web-resource-name>app</web-resource-name>
     <url-pattern>/wicket/bookmarkable/org.wicketsample.LogoutPage</url-pattern>
   </web-resource-collection>
   <!-- OMIT auth-constraint -->
 </security-constraint>
Prepare the app for the fortress realm.
<Context reloadable="true">
 <Realm className="org.apache.directory.fortress.realm.tomcat.Tc7AccessMgrProxy"
   debug="0"
   resourceName="UserDatabase"
   defaultRoles=""
   containerType="TomcatContext"
   realmClasspath=""
 />
</Context>
This file hooks a web app into the tomcat fortress realm which performs security functions like authenticate and isUserInRole. It’s also where the security session gets created by fortress.
more on the realm
The fortress realm’s proxy jar must be present under tomcat’s lib folder (as discussed in the quickstarts).
The proxy jar is a shim that uses a URLClassLoader to reach its implementation libs. The proxy prevents the realm impl libs, pulled in as dependency to web app, from interfering with the container’s system classpath thus providing an error free deployment process free from classloader issues. The proxy offers the flexibility for each web app to determine its own version/type of security realm to use, satisfying a variety of requirements related to web hosting and multitenancy.
Prepare fortress for either apacheds or openldap server usage.
Pick One:
a. ApacheDS
# This param tells fortress what type of ldap server in use:
ldap.server.type=apacheds

# ldap host:
host=localhost

# ldap port:
port=10389

# These credentials are used for read/write access to all nodes under suffix:
admin.user=uid=admin,ou=system
admin.pw=secret

# This is min/max settings for LDAP administrator pool connections that have read/write access to all nodes under suffix:
min.admin.conn=1
max.admin.conn=10

# This node contains fortress properties stored on behalf of connecting LDAP clients:
config.realm=DEFAULT
config.root=ou=Config,dc=example,dc=com

# Used by application security components:
perms.cached=true

# Fortress uses a cache:
ehcache.config.file=ehcache.xml
b. OpenLDAP
# This param tells fortress what type of ldap server in use:
ldap.server.type=openldap

# ldap host:
host=localhost

# openldap default port:
port=389

# These credentials are used for read/write access to all nodes under suffix:
admin.user=cn=Manager,dc=example,dc=com
admin.pw=secret

# This is min/max settings for LDAP administrator pool connections that have read/write access to all nodes under suffix:
min.admin.conn=1
max.admin.conn=10

# This node contains fortress properties stored on behalf of connecting LDAP clients:
config.realm=DEFAULT
config.root=ou=Config,dc=example,dc=com

# Used by application security components:
perms.cached=true

# Fortress uses a cache:
ehcache.config.file=ehcache.xml
Tell wicket about fortress sessions and objects.
a. Uncomment fortress session override.
Here we override app’s wicket session with a new one that can hold onto fortress session and perms:
 // TODO STEP 7a: uncomment save fortress session to wicket session:
 @Override
 public Session newSession(Request request, Response response)
 {
   return new WicketSession(request);
 }
b. Uncomment fortress spring bean injector.
Next we tell the app to use spring to inject references to fortress security objects:
 // TODO STEP 7b: uncomment to enable injection of fortress spring beans:
 getComponentInstantiationListeners().add(new SpringComponentInjector(this));
These steps are necessary to get fortress runtime wired into the sample app.
Get fortress objects injected to the wicket base page, enable fortress secured page links.
a. Uncomment fortress spring bean injection.
This step automatically instantiates the fortress objects needed for security processing.
 // TODO STEP 8a: enable spring injection of fortress bean here:
 @SpringBean
 private AccessMgr accessMgr;

 @SpringBean
 private J2eePolicyMgr j2eePolicyMgr;
These objects are used by the app to make AccessMgr calls to functions like checkAccess and sessionPermissions.
b. Uncomment call to enableFortress.
This performs the boilerplate security functions required by fortress during app session startup:
 // TODO STEP 8b: uncomment call to enableFortress:
 try
 {
   SecUtils.enableFortress(
      this, ( HttpServletRequest ) getRequest().getContainerRequest(),
      j2eePolicyMgr, accessMgr );
 }
 catch (org.apache.directory.fortress.core.SecurityException se)
 {
    ...
 }
c. Change to FtBookmarkablePageLink
The advantage here is other than a name change, everything else stays the same, and now the links are secured.
 // TODO STEP 8c: change to FtBookmarkablePageLink:
 add( new FtBookmarkablePageLink( "page1.link", Page1.class ) );
 add( new FtBookmarkablePageLink( "page2.link", Page2.class ) );
 add( new FtBookmarkablePageLink( "page3.link", Page3.class ) );
This component maps a page link to a fortress permission. The wicket id passed in, e.g. page1.link, is converted to a fortress permission, objName: page1, opName: link.
Enable fortress secured buttons. Each page has three buttons. Same as before, only the name changes.
a – i. change the button class name to FtIndicatingAjaxButton:
 // TODO STEP 9a: change to FtIndicatingAjaxButton:
 add( new FtIndicatingAjaxButton( "page1.button1" )
This component maps the buttons to fortress permissions. The wicket id, e.g. page1.button1, is converted to a fortress permission, objName: page1, opName: button1.
10. Build & Deploy Web App
Deploy to tomcat server:
mvn clean tomcat:deploy -Dload.file
Or if already deployed:
mvn clean tomcat:redeploy -Dload.file
The -Dload.file system parameter tells maven to load the wicket sample security policy into ldap in addition to deploying the app. Since the load needs to happen just once, you may drop it from future invocations:
mvn tomcat:redeploy
We’re done with setup. Now onto testing…
Testing the Sample App Security Policy
The wicket-sample security policy is loaded automatically during maven deployment step. The file: wicket-sample-security-policy.xml
How to create an rbac policy was covered recently:
The Seven Steps of Role Engineering
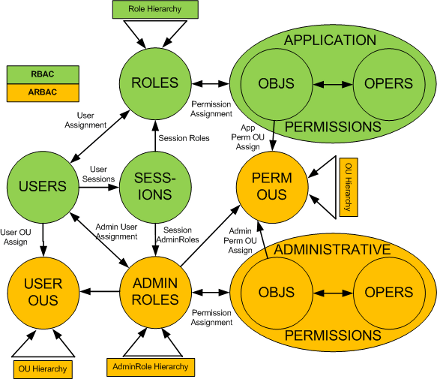
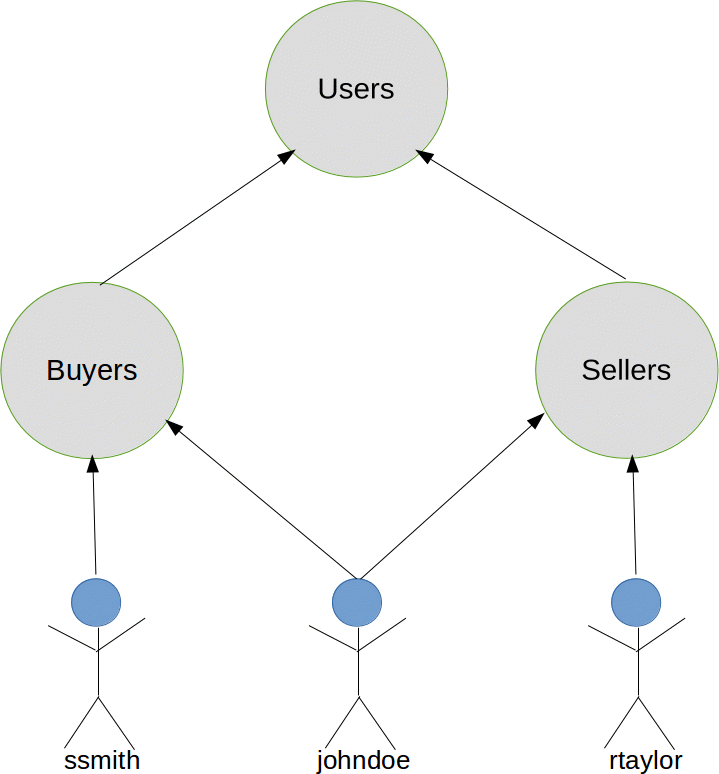
The diagram below depicts the wicket sample role hierarchy and its user to role assignments:
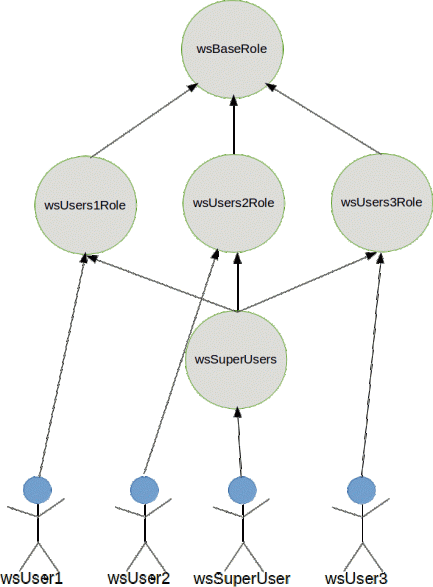
sample security policy
- wsBaseRole is inherited by all other roles
- wsSuperUsers inherits wsUsers1Role, wsUsers2Role and wsUsers3Role
- wsUser1 is assigned wsUsers1Role and has access to buttons on Page1
- wsUser2 is assigned wsUsers2Role and can hit buttons on Page2
- wsUser3 is assigned wsUsers3Role and has buttons on Page3
- wsSuperUser is assigned wsSuperUser role has all pages and all buttons
Use Cases for Testing
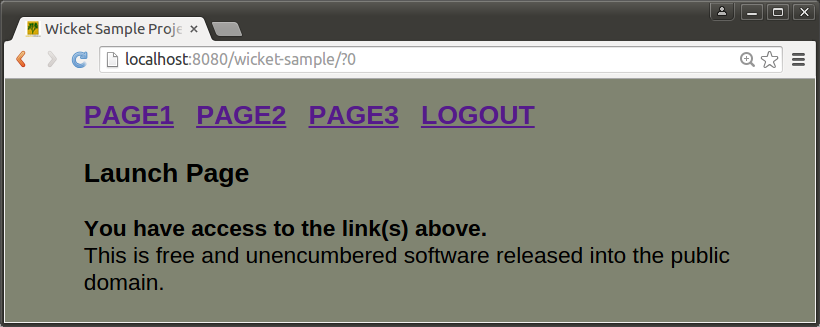
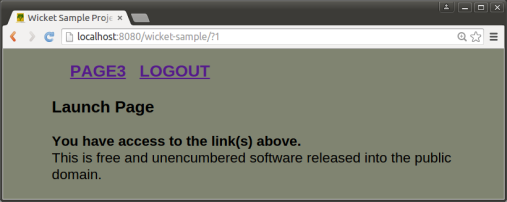
a. wssuperuser/password
Receives links for Page1, Page2 and Page3.

wsSuperUser launch page
b. wsuser1/password
Receives a page link for Page1. May only view and click on Page1’s buttons.

wsUser1 launch page
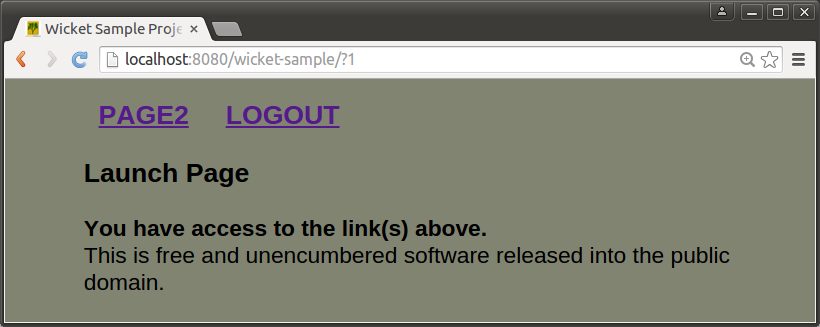
c. wsuser2/password
Receives link for Page2. May only view and click on Page2’s buttons.

wsUser2 launch page
d. wsuser3/password
Receives link for Page3. May only view and click on Page3’s buttons.
wsUser3 launch page
More on sample security policy
As stated in the beginning, the sample wicket security controls are not comprehensive. For example, a user may navigate by manually entering page urls thus sidestepping the secured page link component. In this scenario the user will be prevented from clicking on buttons unless otherwise authorized. Still, allowing users to navigate to unauthorized pages is a bad practice. The Apache Fortress End-to-End Security Tutorial uses spring security controls to lock down pages. There are many other ways – how would you do it?